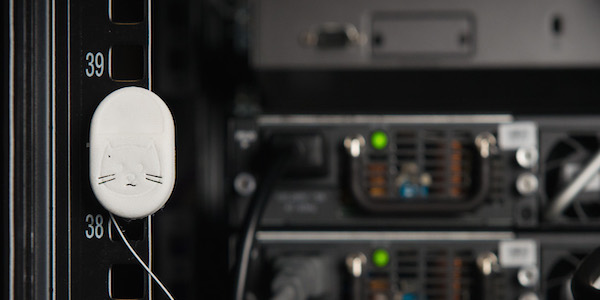
If you have just taken delivery of your first set of kittens ready for deployment in your rack or you are thinking about ordering then I’m hoping to give you all the info you need to get them fitted. It’s not a difficult process and the installation guide will talk you through the basics but there are a few tips that I want to give you to help along the way.
Optimal kit installation:
- Our recommended kit for a rack would be a 8 temperature sensors, 1 temperature and humidity sensor and 1 gateway. This is to give you the best coverage and the best visibility of your rack on the heat map.
- Fixing your kittens – We have found that it’s best to use the cable ties provided for the data centre environment. It’s warm and dry so it’s not the best conditions for sticky pads, they will work but we prefer the reliability of the cable ties. The doors on the front and back of the racks should be easy to slip the cable ties through.
- 4 of the kittens should be placed at the front of the rack equally spaced from top to bottom in order to get a full spread of temperatures to see whats going on in the whole rack.
- 4 of the kittens should be placed in the same way from top to bottom in the back of the rack.
- If you have purchased a humidity monitor then try fixing that in the top of the rack to see whats going on overall.
- The gateway is going to need power and an ethernet connection. You will be provided with a normal UK plug socket for the power, if you require power over ethernet then just let us know (extra cost).
- The gateway will need to be fitted within the rack for best signal, it can be sat on a shelf, on top of a server or better still attached to the top of the rack with cable ties.
Tips:
- The kittens sense the temperature from their faces so make sure you face the kitten in the direction that you want the most sensitivity.
- Rename the kittens when you get them so you can easily know where they live. You can do this by clicking on the kitten and editing the name (you can also add notes to the notes field).
- If you aren’t sure which kitten you have in your hand at any one time just push the kittens nose, till the LED lights up (red for the normal temperature sensors and green for the humidity sensors) and it will flash up on your account.
- Don’t forget that you can move the kittens about as much as you like. If you have a problem area in a rack you could alway re group them all around a few machines for a few days or weeks to see whats going on. Just don’t forget to change the names of the kittens and change the heat map so you can see exactly whats going on.
- Try playing around with different view for your heat map like the rack views from the front or back, different analytics and even hot or cold alerts to get the best out of your purr account.
If you want some ideas about the kind of insights you can get from the information check out our previous blog: Using onboard monitoring? Here’s four things you’re missing.
