
- ALL RESOURCES
- SUPPORT
- USES & CASE STUDIES
- DATA SHEETS
SUPPORT
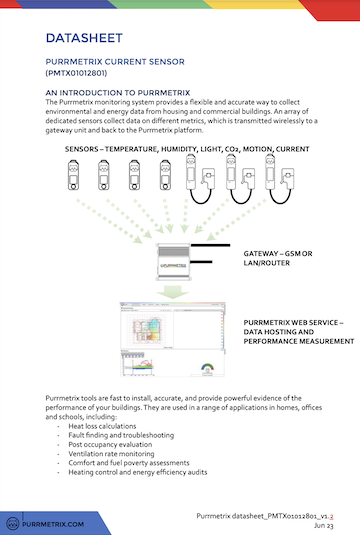
Whatever you want to achieve with Purrmetrix, we want to help. Here’s a full range of resources covering all the questions we get asked about installing and working with our tools.
These pages should help you with the most common questions about the system. Follow them for a walk through – step by step – on how to get started and access the more advanced features.
To use the Purrmetrix service you will need to get yourself
1) Purrmetrix hardware (minimum a sensor and a gateway unit) and
2) your own Purrmetrix web service account.
If you don’t have any hardware, please get in touch to discuss what you will need. If your hardware has been given to you by someone else, you will need to adopt that hardware into your account. See the section on 'Managing hardware' for more details.
Once you have both hardware and web service, you are ready to begin installation.
Need extra help?
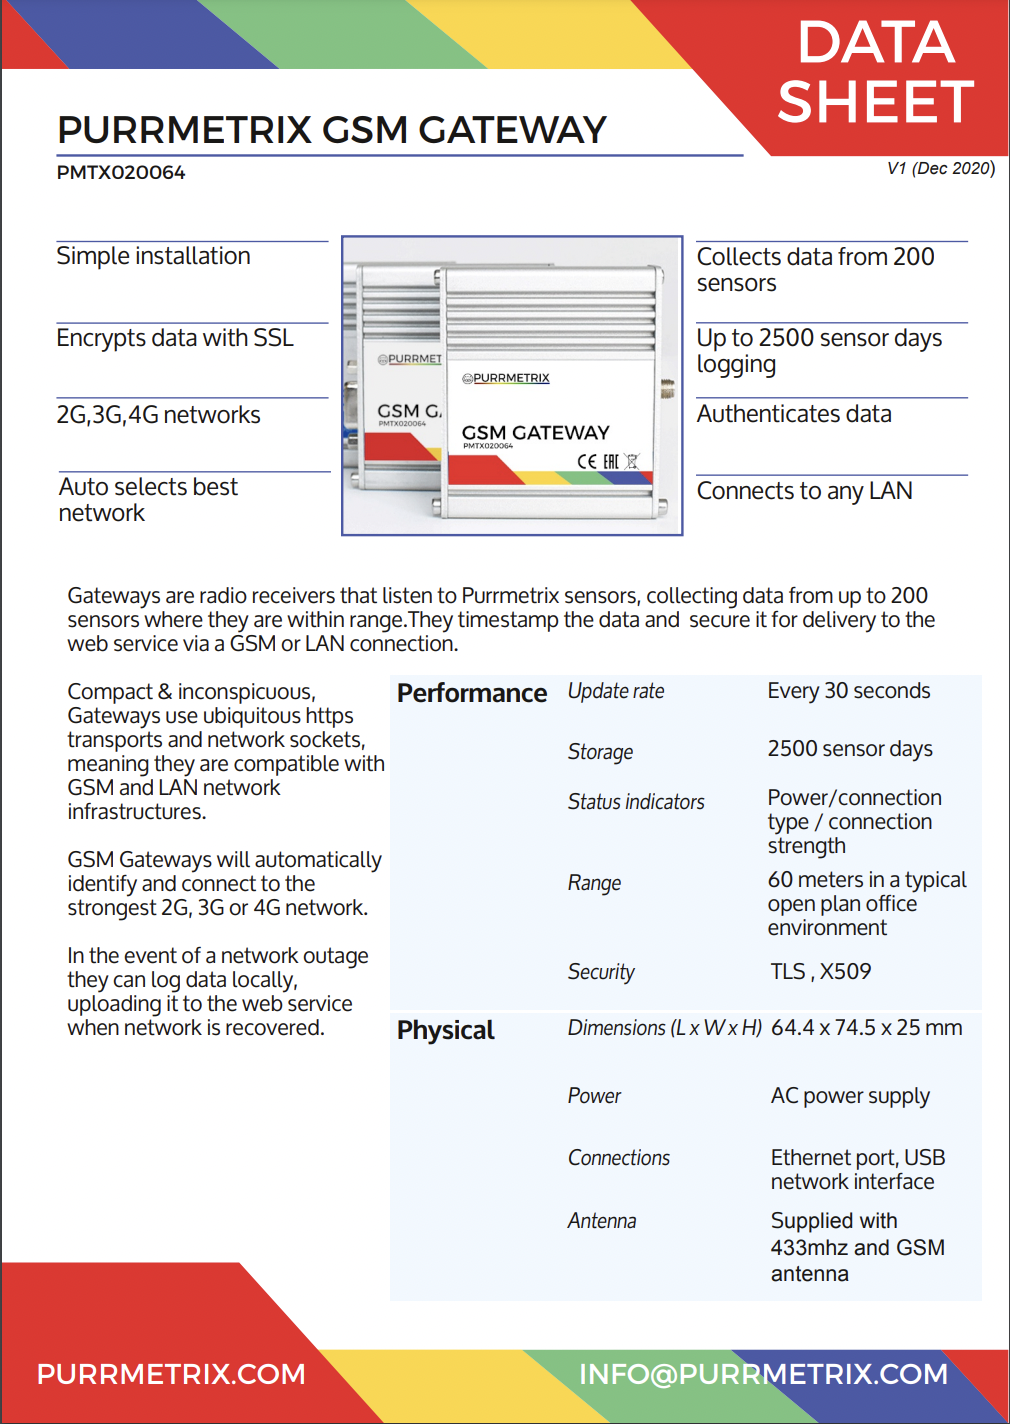
With hardware and web service in your hand, your first step is to connect your gateway and sensors. First, attach both antennas to the gateway and plug the power supply into the gateway. You should see some green LEDs flashing while the gateway finds a mobile connection. Once a connection is found, the LEDs will stabilise.
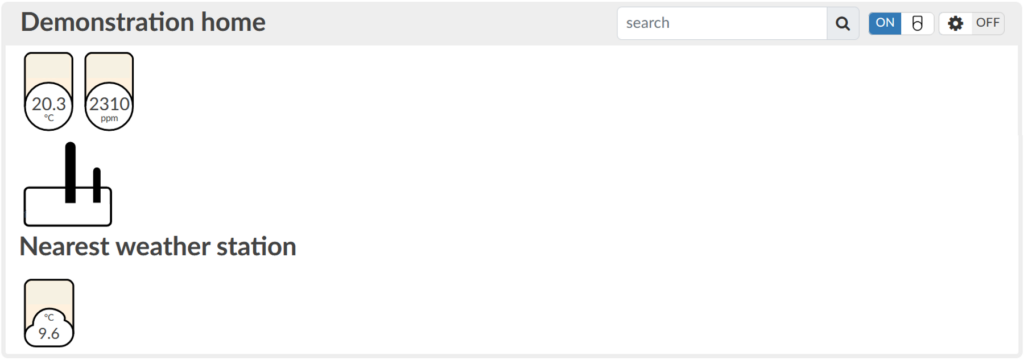
Once the gateway is activated, open your web service, and open the sensor library:

Here you should find your gateway and sensor icons - these sensors will turn tan coloured when they are connected. The CO2 sensors will not be connected until plugged into a wall socket.
If you want to know which sensor is in your hand, simply squeeze the cat face and let go, the sensor icon in the web service will go red and will temporarily appear in the top right corner.
You can now prepare to install your sensors where you need them. But first, you will need to be familiar with how to create a project and build an analytics view in your web account.
Click here to find out how to create your first project and place your sensors.
Or, click here to check how to get hardware and a web service.
Need extra help?
Your account will originally only have 1 project called "<name>'s first project". You can change this name by double clicking on it or alternatively you can create a new project by clicking Projects on the top bar > Make new project. In order to be able to access weather data to compare against your sensor data, add the location of your project to project settings (the gear tool on the project bar).
If you have multiple projects with different sensors, we recommend creating a group under Create view on the top bar. The relevant sensor icons can then be dragged into this group from the sensor library.
Before placing your sensors around the home, make a note of their location (eg. kitchen door frame). This can be done by double clicking on the relevant sensors and either changing the name or writing in notes.
Recommended sensor locations
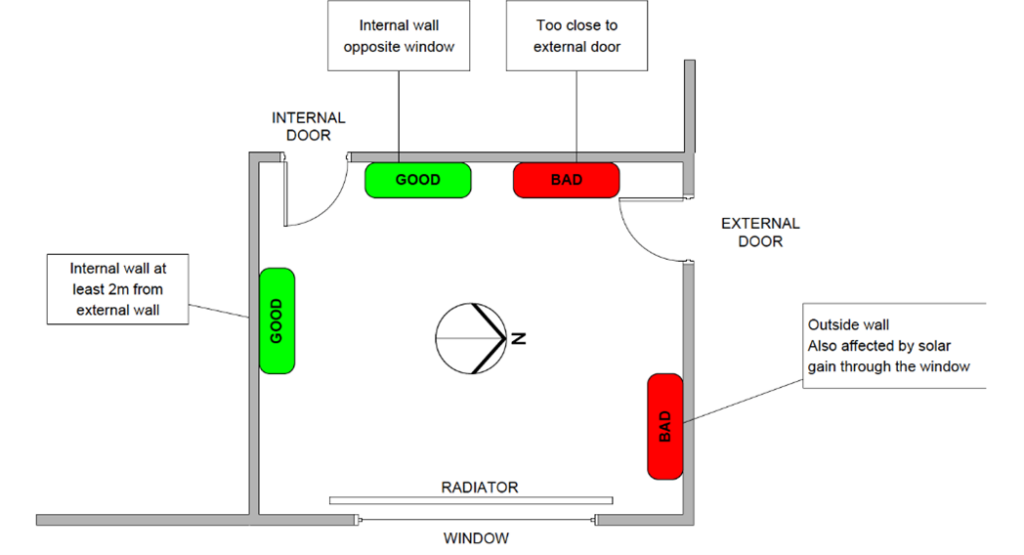
Careful location of these sensors is important to achieve consistent measurements. As much as possible we need to avoid interference from solar gain, local heat, sources or occupants. In general:
- Sensors should be between 1 and 2m high.
- Avoid placing sensors in direct sun, or within 60cm of a heat source.
- Avoid placing sensors on external walls or close to external doors.
For detailed assessments there should be a sensor in each room, but for normal diagnostic monitoring we recommend a sensor in:
- The main living room
- The main bedroom
- The kitchen
- The main bathroom
CO2 sensors should be plugged in a main living area at a height between 30 and 170 cm.
Click here to find out how to build your first analytics view.
Need extra help?
Now you have connected your gateway, sensors and setup your project, you can build the first view to analyse your data.
In Purrmetrix ‘views’ are the blocks that you use to organise your sensors and carry out an analysis. These can range from something simple like a bar chart or more complex like a dew point analysis. Under the 'create view' menu, you can find all the different types of view available. Simply click one and drag in the relevant sensors.
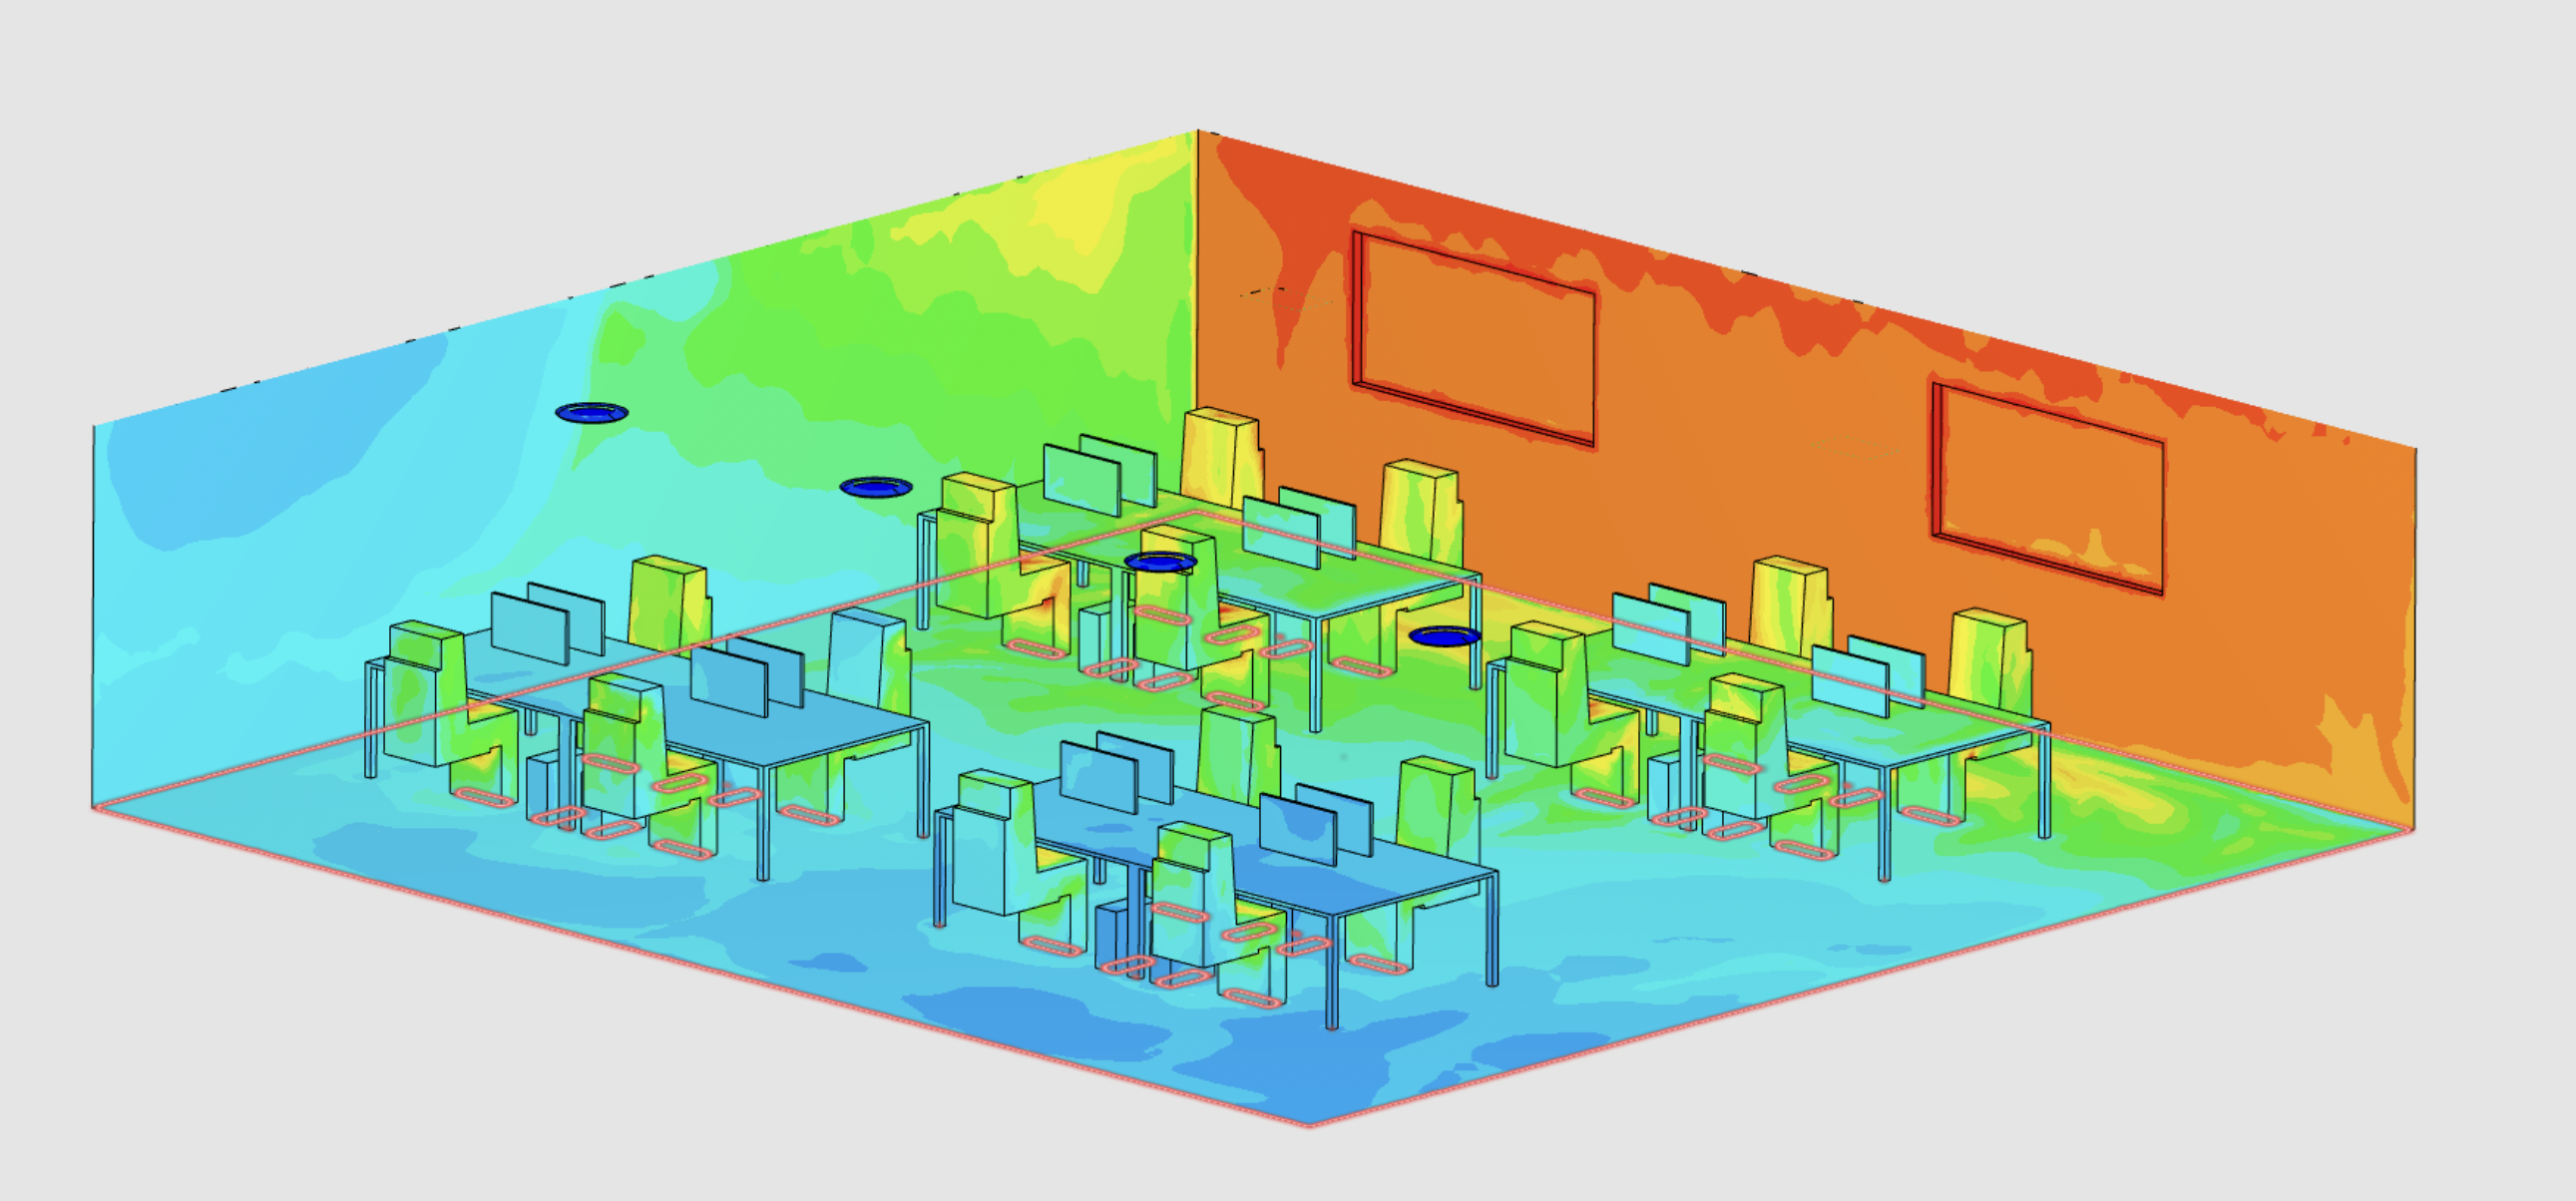
For most users, the best starting point is a heatmap view. Heatmap views let you locate your sensors in a plan or picture of your building and gives you a great overview of what is happening, highlighting areas and times where you might want to look deeper into the data. They’re also really useful as a record of where sensors are installed.
To build a heat map, open the ‘create view’ menu (see below) and select Graph Heatmap.
- A new, empty view will open up.
- Click on the title of the box to change its name. You can now re name the Graph Heatmap.
- Upload a plan (PNG, JPG, GIF, EPS) by dropping the image on the hot spot.
- Physically pick up a sensor and identify it. If it isn’t named you will need to name it at this point.
- You can also make a note in the web service of the exact / descriptive location you plan to put the sensor in, by double clicking on the kitten and filling in the notes field (eg ‘under desk 1’).
- In the web service, drag each kitten to the right location on your image.
- You can now fix your real kittens in the right location.
- Your plan will automatically populate with data.

Notes
- Any images uploaded will be resized to 800 px wide
- It is possible to zoom in and out along the timeline by dragging and clicking your mouse to the left (to zoom out) or to the right (to zoom in)
- On any graph you can leave a note that relates to a point in time by double clicking on the x-axis
- PRO TIP: once you have set up this first view it is helpful to create a project called BACKUP and copy and paste this view into it. This will then keep the record of where you originally installed the sensors.
Need extra help?
With your sensors fixed and the first view set up, there are a range of other views to help you interpret the data.
Setting up views follows the same steps as with the heatmap:
- Open ‘create view’ and select the view you want.
- Once the view opens, drag and drop the sensors you want to analyse into the new view. You can either select the sensors from the heatmap you made in the last step, or from the library block at the top of your project.
- You can change the title of the view by double clicking on the title
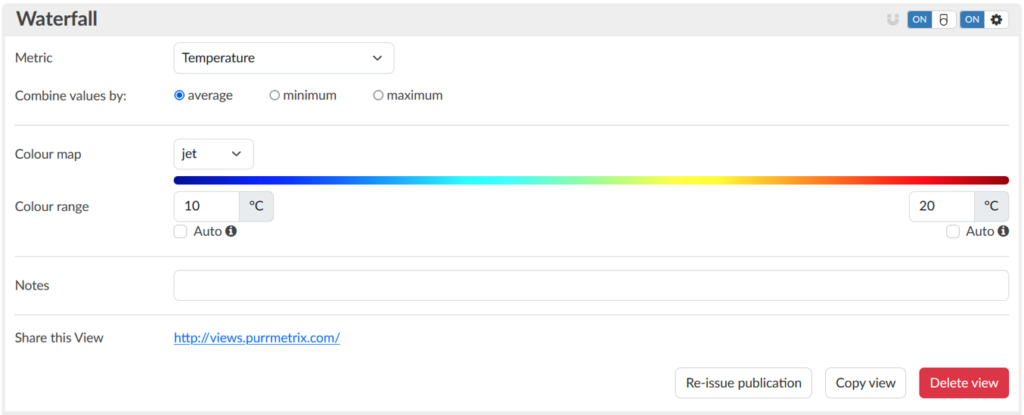
- Click on the gear icon to open up the settings panel. Each view has its own settings, for example in the waterfall view you can change what metric your sensors are reporting, link the colour map to your temperature range and put in averages.
- It’s possible to change the order of views by dragging each view box using its top border.
Notes
To remove sensors from a view simply drag them to the bottom right and drop them into the bin that appears. They will only disappear from the view you originally selected them, and will remain in location in all others.
If you are moving sensors from one plan view to another they will retain their location on the plan.
It is possible to copy a view, complete with sensors. Open the setting by clicking on the gear icon and click on the copy button at the bottom left. To paste, open the actions menu and click ‘Paste View’ and a new copy will appear at the top of the list of views. This option can be used to lift a view from one project and copy it into a new project.
Need extra help?
Purr’s webservice is a very flexible tool that can support many different types of analyses on data from any location in your project. This can rapidly create a lot of different views, and organising these in a logical fashion will save time and improve performance.
To do this we use ‘projects’. A project, for Purr, can be any group of views that have a common theme. Some examples:
- All the views for each building in an estate
- All the views for refrigeration units where there is some question mark over performance
- A group of views set up for the north end of several greenhouses
To set up a project:
- Click on the create new project button near the top of the page.
- Select the sensors you want from the library, or paste an existing view in (see ‘working with views‘) to automatically import all the hardware you want to associate with that view
- Name your project using the project dialogue box
Notes
For sensitive analyses, projects can be locked as private to one user only.
We recommend creating a Backup project from your first installation. This can be used to keep copies of any heatmaps you create and thus is a safe record of where sensors are installed.
Need extra help?
Once you have setup your Purr equipment and account, there are many views available that can help you make sense of the data you are collecting.
Each view has its own localised settings, however the basic process for setting up the views is similar: open the view, select the kittens that need to contribute to the view, drag and drop them into the view box, adjust the settings in the view to give you the information you are interested in.
To demonstrate, we shall set up a ‘Graph and Heatmap’ view:
- Click on the ‘graph and heatmap’ icon to open up the view.
- Upload a plan or image to locate the kittens on.
- Select the sensor you want to contribute to that view. You can either select kittens from the ‘library’ block at the top of the views, or direct from another view.
- Drag and drop those sensors into the new view.
- Click on the title of the view to give it a new name and to set it up with the right characteristics. In this case you can set the range of the heatmap’s colours to reflect the temperature range you are interested in.
- You can now use the date picker on the graph to select the time that interests you.
Sharing views
If you want to share the results of a view without having to give account access. Purr’s views can be shared publicly, either a simple web page, or as an object embedded in a dashboard using iframes.
To share a view:
- Set up the view and select the time frame that you wish to share.
- Click on the view title to bring up the view dialogue.
- Click on the embeddable link for this view. It will open a new page.
- Copy and paste the URL for this new page to share with colleagues or place in an iframe for a dashboard
Notes
To remove sensors from a view simply drag them to the bin icon. They will only disappear from the view you originally selected them, and will remain in location in all others.
If you are moving sensors from one plan view to another they will retain their location on the plan.
It is possible to copy a view, complete with sensors. Open the view dialogue by clicking on the view name and click on the copy button at the bottom left. To paste, open the actions menu and click ‘Paste View’ and a new copy will appear at the top of the list of views. This option can be used to lift a view from one project and copy it into a new project.
At this point, not all views support linking to a preselected time view. The default is to show the last hour, day or week.
Need extra help?
Purr’s system supports a number of features to make it easier to manage your hardware.
If you have an unnamed sensor, you can find it on the webservice by simply pressing the sensors’s nose. It's LED should flash, and after a short – typically 10 second – delay – it should appear red on the plan. It will also appear in the top right hand corner of your page.
To understand more about the what sensor is doing what, double click on it. The dialogue box will show you name, ID, notes on location and which views the sensor is being used in.
Giving away kittens
If you are a user in more than one account, it is possible to give away sensors or gateways from one account to another. To do so:
- Select the hardware you want to give away.
- Click on the ‘actions’ box and select ‘Give away stuff’.
- When the ‘Give away stuff’ dialogue opens, select the account you want it to go to.
- The stuff will arrive in the new account library, ready for use.
Click here to understand more about organising your views
You can also create sensors that represent data from other sources. Click here to look at how to import data like this.
Need extra help?
There are all sorts of reasons why you might want to share data with people and services outside the Purrmetrix web account, so we have provided several tools to help you. Depending on your application you might want to:
- Share a view with an external audience
- Export some data for analysis offline
- Integrate data with another software service using an API
Sharing a view with an external audience
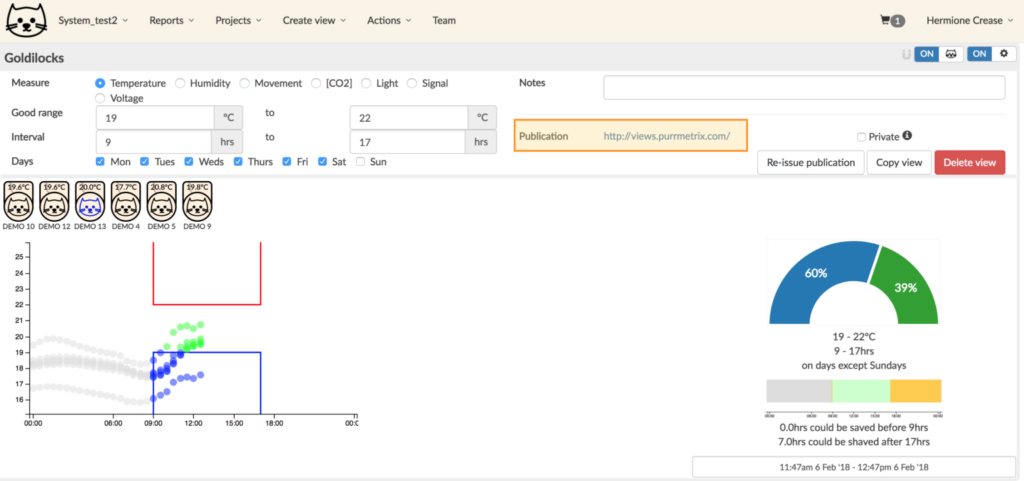
For Basic and Pro users, all views can be ‘published’: turned into a unique URL that can be sent to any audience, or embedded in an iframe for use with a dashboard. These URLs reflect all the options that are selected in settings when the view is published, so date ranges, colour mapping and choices about average or max/min values will carry over into the published view.
To publish a view open the settings dialogue (by clicking on the gear icon in the top right hand corner) and look for the publication link:
Exporting data
If you want to pull out your data and stare at its loveliness in a spreadsheet, then you can export from the basic graph/heatmap view. Simply set up the graph to reflect the time period you are interested in, and hit the download button (highlighted below).
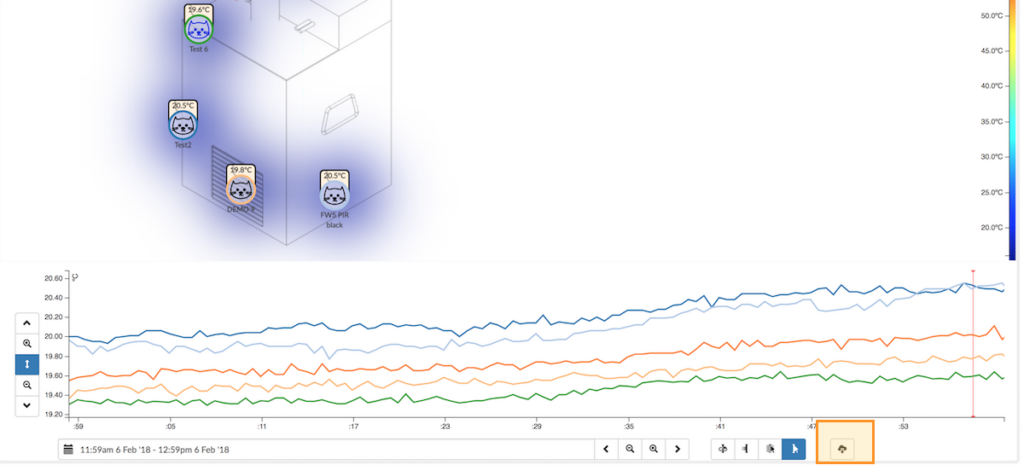
The web service will provide a tool that allows you to select the time period you are interested in plus a choice of time steps to integrate the data. You can then download your data.
Integrating data using an API.
For Pro users, the web service offers a customer API that allows time series data to be accessed as JSON objects. API requests are made using HTTPS POST requests with a message body specifying the parameters of the request.
To get an API key for your Purrmetrix account, please contact info@purrmetrix.com. Once issued they will be found on the ‘Team’ page of your account.
For more details on how to create and use the Purrmetrix API, including limits on its use, please see our developers guide documentation.
Look at how to import data from non-native sources.
Sometimes all this data needs to be put into context. If you have regular reports that you need to share with customers, Purrmetrix supports the creation of word report documents on a regular cycle. To find out how, click here.
Need extra help?
If you have data from other sources you don’t need to confine your analysis to data that is collected by Purrmetrix hardware. Importing data creates a new sensor icon (an import sensor) which behaves exactly like any other kitten and can be added to all the analytics views in the same way.
To create an import kitten follow these steps:
- Go to ‘Integrations’ and click ‘create import sensor’
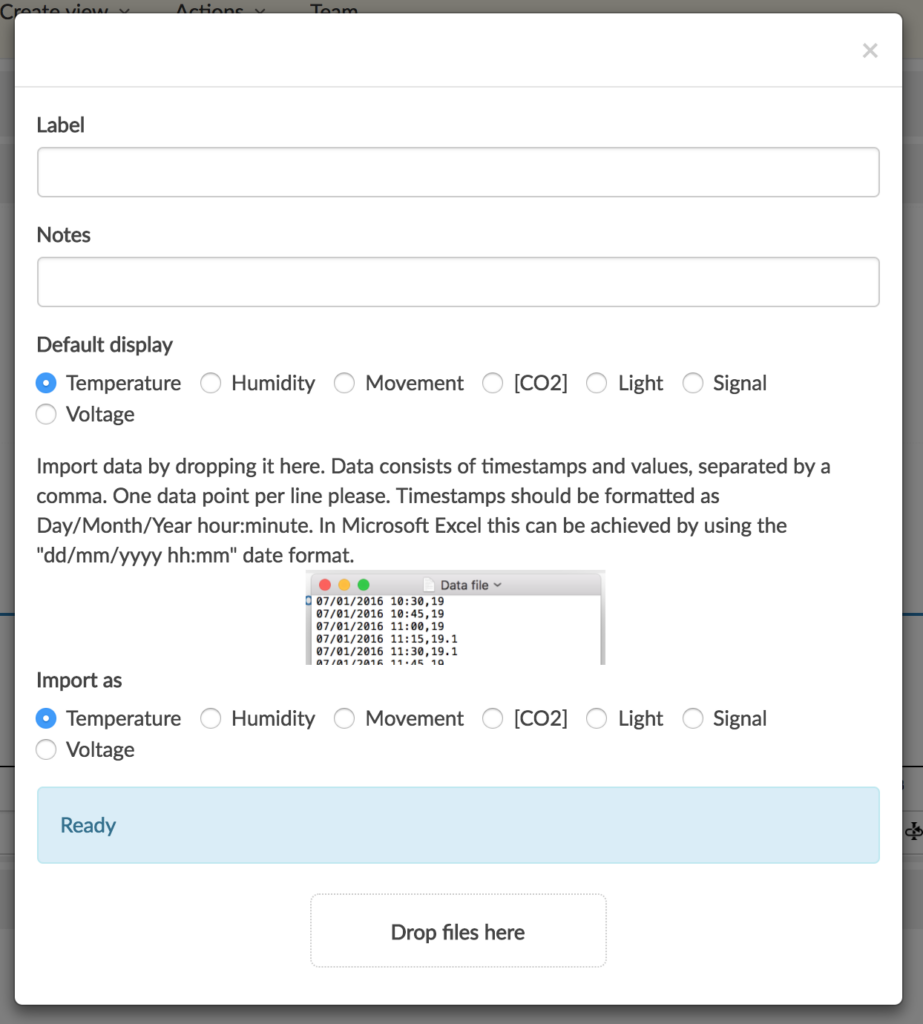
- You will get a dialogue box (see below) which allows you to label the import sensor and make notes on the data source
- You will need a pre-prepared CSV file to a specific format (see notes below)
- Drag and drop the CSV file onto the hotspot. Don’t forget to nominate what sort of data you are importing.
- There will be a short pause and the server will create a new sensor
Adding more data.
You can always add more data to an existing import sensor – double click on the sensor will reveal a hotspot. You can drag and drop another CSV for a different time period and extend the time period that the import sensor covers.
Now you have all of this data you may want to share it or work with it in another application. Click here for more information on sharing data.
Want to go back and look at ways to manage and move hardware in your account? Click here.
Need extra help?
Many customers need to report results on a regular cycle to third parties. Purrmetrix allows our customers to create word based reports that can be run and downloaded whenever needed, including any views you need.
Reports work by using a Word template, which provides placeholders that mark where each view should be included. Choose the views that you want to include in the report and you can then run all the views for the time period you want to report on.
Want more detail?
To make a new report, go to the reports section on the top menu and click ‘Make new report’
- You can either use one of our prepared templates, or create your own Word document with the right placeholders in it. For more details see the notes section
- Upload the template to the report on the hot spot
- To attach views to the report, search for the titles of the views you are interested in. Once the search results are returned drag the view up to the list above the search box. You can reorder the views into the order you wish them to appear in the template
- When all the views are selected, you can select a date range for your report.
- Run the analysis for each view by clicking on the tool box icon. You will get a small preview thumbnail once it is completed
- Once the analyses are complete, click publish and your report will download automatically.
Notes
Reports need a Word template, saved as a .docx format.
Gateway not connected
If the gateway LEDs continue to flash for longer than 5 minutes, the gateway may be struggling to find a mobile connection.
- Make sure antennas attached to the gateway the correct way round.
- Try restarting the gateway and wait 5 minutes to see if it connected.
- If you're still having issues/if you know mobile signal is weak in the area, try moving the gateway to another location in the room/house.
Sensor (temp/humidity or current) not connected
If your sensor LED does a slow blink when the kitten face is pressed or appears asleep on account (see below), press the kitten face 4 times quickly to wake it up. Once awake, the LED should flash quickly when pressed.
If the gateway is not seeing any of the kittens and appears connected on account - contact us.
You are unable to see the sensor library/settings
You are not an admin on your account (you can check this on the teams page). Contact the owner of your account (or any admin is able to make you an admin).
Contact us if any problems persist.
CASE STUDIES


DATA SHEETS

Working with Purrmetrix
Whatever you want to achieve with Purrmetrix, we want to help. Here’s a full range of resources covering all the questions we get asked about installing and working with our tools.
These pages should help you with the most common questions about the system. Follow them for a walk through – step by step – on how to get started and access the more advanced features.
To use the Purrmetrix service you will need to get yourself
1) Purrmetrix hardware (minimum a sensor and a gateway unit) and
2) your own Purrmetrix web service account.
If you don’t have any hardware, please get in touch to discuss what you will need. If your hardware has been given to you by someone else, you will need to adopt that hardware into your account. See the section on 'Managing hardware' for more details.
Once you have both hardware and web service, you are ready to begin installation.
Need extra help?
With hardware and web service in your hand, your first step is to connect your gateway and sensors. First, attach both antennas to the gateway and plug the power supply into the gateway. You should see some green LEDs flashing while the gateway finds a mobile connection. Once a connection is found, the LEDs will stabilise.
Once the gateway is activated, open your web service, and open the sensor library:
Here you should find your gateway and sensor icons - these sensors will turn tan coloured when they are connected. The CO2 sensors will not be connected until plugged into a wall socket.
If you want to know which sensor is in your hand, simply squeeze the cat face and let go, the sensor icon in the web service will go red and will temporarily appear in the top right corner.
You can now prepare to install your sensors where you need them. But first, you will need to be familiar with how to create a project and build an analytics view in your web account.
Click here to find out how to create your first project and place your sensors.
Or, click here to check how to get hardware and a web service.
Need extra help?
Your account will originally only have 1 project called "<name>'s first project". You can change this name by double clicking on it or alternatively you can create a new project by clicking Projects on the top bar > Make new project. In order to be able to access weather data to compare against your sensor data, add the location of your project to project settings (the gear tool on the project bar).
If you have multiple projects with different sensors, we recommend creating a group under Create view on the top bar. The relevant sensor icons can then be dragged into this group from the sensor library.
Before placing your sensors around the home, make a note of their location (eg. kitchen door frame). This can be done by double clicking on the relevant sensors and either changing the name or writing in notes.
Recommended sensor locations
Careful location of these sensors is important to achieve consistent measurements. As much as possible we need to avoid interference from solar gain, local heat, sources or occupants. In general:
- Sensors should be between 1 and 2m high.
- Avoid placing sensors in direct sun, or within 60cm of a heat source.
- Avoid placing sensors on external walls or close to external doors.
For detailed assessments there should be a sensor in each room, but for normal diagnostic monitoring we recommend a sensor in:
- The main living room
- The main bedroom
- The kitchen
- The main bathroom
CO2 sensors should be plugged in a main living area at a height between 30 and 170 cm.
Click here to find out how to build your first analytics view.
Need extra help?
Now you have connected your gateway, sensors and setup your project, you can build the first view to analyse your data.
In Purrmetrix ‘views’ are the blocks that you use to organise your sensors and carry out an analysis. These can range from something simple like a bar chart or more complex like a dew point analysis. Under the 'create view' menu, you can find all the different types of view available. Simply click one and drag in the relevant sensors.
For most users, the best starting point is a heatmap view. Heatmap views let you locate your sensors in a plan or picture of your building and gives you a great overview of what is happening, highlighting areas and times where you might want to look deeper into the data. They’re also really useful as a record of where sensors are installed.
To build a heat map, open the ‘create view’ menu (see below) and select Graph Heatmap.
- A new, empty view will open up.
- Click on the title of the box to change its name. You can now re name the Graph Heatmap.
- Upload a plan (PNG, JPG, GIF, EPS) by dropping the image on the hot spot.
- Physically pick up a sensor and identify it. If it isn’t named you will need to name it at this point.
- You can also make a note in the web service of the exact / descriptive location you plan to put the sensor in, by double clicking on the kitten and filling in the notes field (eg ‘under desk 1’).
- In the web service, drag each kitten to the right location on your image.
- You can now fix your real kittens in the right location.
- Your plan will automatically populate with data.
Notes
- Any images uploaded will be resized to 800 px wide
- It is possible to zoom in and out along the timeline by dragging and clicking your mouse to the left (to zoom out) or to the right (to zoom in)
- On any graph you can leave a note that relates to a point in time by double clicking on the x-axis
- PRO TIP: once you have set up this first view it is helpful to create a project called BACKUP and copy and paste this view into it. This will then keep the record of where you originally installed the sensors.
Need extra help?
With your sensors fixed and the first view set up, there are a range of other views to help you interpret the data.
Setting up views follows the same steps as with the heatmap:
- Open ‘create view’ and select the view you want.
- Once the view opens, drag and drop the sensors you want to analyse into the new view. You can either select the sensors from the heatmap you made in the last step, or from the library block at the top of your project.
- You can change the title of the view by double clicking on the title
- Click on the gear icon to open up the settings panel. Each view has its own settings, for example in the waterfall view you can change what metric your sensors are reporting, link the colour map to your temperature range and put in averages.
- It’s possible to change the order of views by dragging each view box using its top border.
Notes
To remove sensors from a view simply drag them to the bottom right and drop them into the bin that appears. They will only disappear from the view you originally selected them, and will remain in location in all others.
If you are moving sensors from one plan view to another they will retain their location on the plan.
It is possible to copy a view, complete with sensors. Open the setting by clicking on the gear icon and click on the copy button at the bottom left. To paste, open the actions menu and click ‘Paste View’ and a new copy will appear at the top of the list of views. This option can be used to lift a view from one project and copy it into a new project.
Need extra help?
Purr’s webservice is a very flexible tool that can support many different types of analyses on data from any location in your project. This can rapidly create a lot of different views, and organising these in a logical fashion will save time and improve performance.
To do this we use ‘projects’. A project, for Purr, can be any group of views that have a common theme. Some examples:
- All the views for each building in an estate
- All the views for refrigeration units where there is some question mark over performance
- A group of views set up for the north end of several greenhouses
To set up a project:
- Click on the create new project button near the top of the page.
- Select the sensors you want from the library, or paste an existing view in (see ‘working with views‘) to automatically import all the hardware you want to associate with that view
- Name your project using the project dialogue box
Notes
For sensitive analyses, projects can be locked as private to one user only.
We recommend creating a Backup project from your first installation. This can be used to keep copies of any heatmaps you create and thus is a safe record of where sensors are installed.
Need extra help?
Once you have setup your Purr equipment and account, there are many views available that can help you make sense of the data you are collecting.
Each view has its own localised settings, however the basic process for setting up the views is similar: open the view, select the kittens that need to contribute to the view, drag and drop them into the view box, adjust the settings in the view to give you the information you are interested in.
To demonstrate, we shall set up a ‘Graph and Heatmap’ view:
- Click on the ‘graph and heatmap’ icon to open up the view.
- Upload a plan or image to locate the kittens on.
- Select the sensor you want to contribute to that view. You can either select kittens from the ‘library’ block at the top of the views, or direct from another view.
- Drag and drop those sensors into the new view.
- Click on the title of the view to give it a new name and to set it up with the right characteristics. In this case you can set the range of the heatmap’s colours to reflect the temperature range you are interested in.
- You can now use the date picker on the graph to select the time that interests you.
Sharing views
If you want to share the results of a view without having to give account access. Purr’s views can be shared publicly, either a simple web page, or as an object embedded in a dashboard using iframes.
To share a view:
- Set up the view and select the time frame that you wish to share.
- Click on the view title to bring up the view dialogue.
- Click on the embeddable link for this view. It will open a new page.
- Copy and paste the URL for this new page to share with colleagues or place in an iframe for a dashboard
Notes
To remove sensors from a view simply drag them to the bin icon. They will only disappear from the view you originally selected them, and will remain in location in all others.
If you are moving sensors from one plan view to another they will retain their location on the plan.
It is possible to copy a view, complete with sensors. Open the view dialogue by clicking on the view name and click on the copy button at the bottom left. To paste, open the actions menu and click ‘Paste View’ and a new copy will appear at the top of the list of views. This option can be used to lift a view from one project and copy it into a new project.
At this point, not all views support linking to a preselected time view. The default is to show the last hour, day or week.
Need extra help?
Purr’s system supports a number of features to make it easier to manage your hardware.
If you have an unnamed sensor, you can find it on the webservice by simply pressing the sensors’s nose. It's LED should flash, and after a short – typically 10 second – delay – it should appear red on the plan. It will also appear in the top right hand corner of your page.
To understand more about the what sensor is doing what, double click on it. The dialogue box will show you name, ID, notes on location and which views the sensor is being used in.
Giving away kittens
If you are a user in more than one account, it is possible to give away sensors or gateways from one account to another. To do so:
- Select the hardware you want to give away.
- Click on the ‘actions’ box and select ‘Give away stuff’.
- When the ‘Give away stuff’ dialogue opens, select the account you want it to go to.
- The stuff will arrive in the new account library, ready for use.
Click here to understand more about organising your views
You can also create sensors that represent data from other sources. Click here to look at how to import data like this.
Need extra help?
There are all sorts of reasons why you might want to share data with people and services outside the Purrmetrix web account, so we have provided several tools to help you. Depending on your application you might want to:
- Share a view with an external audience
- Export some data for analysis offline
- Integrate data with another software service using an API
Sharing a view with an external audience
For Basic and Pro users, all views can be ‘published’: turned into a unique URL that can be sent to any audience, or embedded in an iframe for use with a dashboard. These URLs reflect all the options that are selected in settings when the view is published, so date ranges, colour mapping and choices about average or max/min values will carry over into the published view.
To publish a view open the settings dialogue (by clicking on the gear icon in the top right hand corner) and look for the publication link:
Exporting data
If you want to pull out your data and stare at its loveliness in a spreadsheet, then you can export from the basic graph/heatmap view. Simply set up the graph to reflect the time period you are interested in, and hit the download button (highlighted below).
The web service will provide a tool that allows you to select the time period you are interested in plus a choice of time steps to integrate the data. You can then download your data.
Integrating data using an API.
For Pro users, the web service offers a customer API that allows time series data to be accessed as JSON objects. API requests are made using HTTPS POST requests with a message body specifying the parameters of the request.
To get an API key for your Purrmetrix account, please contact info@purrmetrix.com. Once issued they will be found on the ‘Team’ page of your account.
For more details on how to create and use the Purrmetrix API, including limits on its use, please see our developers guide documentation.
Look at how to import data from non-native sources.
Sometimes all this data needs to be put into context. If you have regular reports that you need to share with customers, Purrmetrix supports the creation of word report documents on a regular cycle. To find out how, click here.
Need extra help?
If you have data from other sources you don’t need to confine your analysis to data that is collected by Purrmetrix hardware. Importing data creates a new sensor icon (an import sensor) which behaves exactly like any other kitten and can be added to all the analytics views in the same way.
To create an import kitten follow these steps:
- Go to ‘Integrations’ and click ‘create import sensor’
- You will get a dialogue box (see below) which allows you to label the import sensor and make notes on the data source
- You will need a pre-prepared CSV file to a specific format (see notes below)
- Drag and drop the CSV file onto the hotspot. Don’t forget to nominate what sort of data you are importing.
- There will be a short pause and the server will create a new sensor
Adding more data.
You can always add more data to an existing import sensor – double click on the sensor will reveal a hotspot. You can drag and drop another CSV for a different time period and extend the time period that the import sensor covers.
Now you have all of this data you may want to share it or work with it in another application. Click here for more information on sharing data.
Want to go back and look at ways to manage and move hardware in your account? Click here.
Need extra help?
Many customers need to report results on a regular cycle to third parties. Purrmetrix allows our customers to create word based reports that can be run and downloaded whenever needed, including any views you need.
Reports work by using a Word template, which provides placeholders that mark where each view should be included. Choose the views that you want to include in the report and you can then run all the views for the time period you want to report on.
Want more detail?
To make a new report, go to the reports section on the top menu and click ‘Make new report’
- You can either use one of our prepared templates, or create your own Word document with the right placeholders in it. For more details see the notes section
- Upload the template to the report on the hot spot
- To attach views to the report, search for the titles of the views you are interested in. Once the search results are returned drag the view up to the list above the search box. You can reorder the views into the order you wish them to appear in the template
- When all the views are selected, you can select a date range for your report.
- Run the analysis for each view by clicking on the tool box icon. You will get a small preview thumbnail once it is completed
- Once the analyses are complete, click publish and your report will download automatically.
Notes
Reports need a Word template, saved as a .docx format.
Gateway not connected
If the gateway LEDs continue to flash for longer than 5 minutes, the gateway may be struggling to find a mobile connection.
- Make sure antennas attached to the gateway the correct way round.
- Try restarting the gateway and wait 5 minutes to see if it connected.
- If you're still having issues/if you know mobile signal is weak in the area, try moving the gateway to another location in the room/house.
Sensor (temp/humidity or current) not connected
If your sensor LED does a slow blink when the kitten face is pressed or appears asleep on account (see below), press the kitten face 4 times quickly to wake it up. Once awake, the LED should flash quickly when pressed.
If the gateway is not seeing any of the kittens and appears connected on account - contact us.
You are unable to see the sensor library/settings
You are not an admin on your account (you can check this on the teams page). Contact the owner of your account (or any admin is able to make you an admin).
Contact us if any problems persist.